Sixth 3D engine demos
Table of Contents
1. Overview
The goal of this project is to show off capabilities and API usage of Sixth 3D engine.
All example scenes in this repository render at interactive framerates.
You can download pre-compiled runnable JAR file with embedded demos from here: sixth-3d-demos.jar
It requires Java 21 or newer to run.
To start the demo application, use command:
java -jar sixth-3d-demos.jar
2. Essentials
Resources to help you understand the Sixth 3D library:
- Read online JavaDoc.
- See Sixth 3D class diagrams. (Diagrams were generated by using JavaInspect utility)
2.1. Minimal example
This is the "Hello World" of Sixth 3D - the minimal boilerplate needed to render any 3D geometry.
eu.svjatoslav.sixth.e3d.examples.essentials.MinimalExample
Brief tutorial:
Here we guide you through creating your first 3D scene with Sixth 3D engine.
Prerequisites:
- Java 21 or later installed
- Maven 3.x
- Basic Java knowledge
2.1.1. Add Dependency to Your Project
Add Sixth 3D to your pom.xml:
<dependencies>
    <dependency>
        <groupId>eu.svjatoslav</groupId>
        <artifactId>sixth-3d</artifactId>
        <version>1.4</version>
    </dependency>
</dependencies>

<repositories>
    <repository>
        <id>svjatoslav.eu</id>
        <name>Svjatoslav repository</name>
        <url>https://www3.svjatoslav.eu/maven/</url>
    </repository>
</repositories>
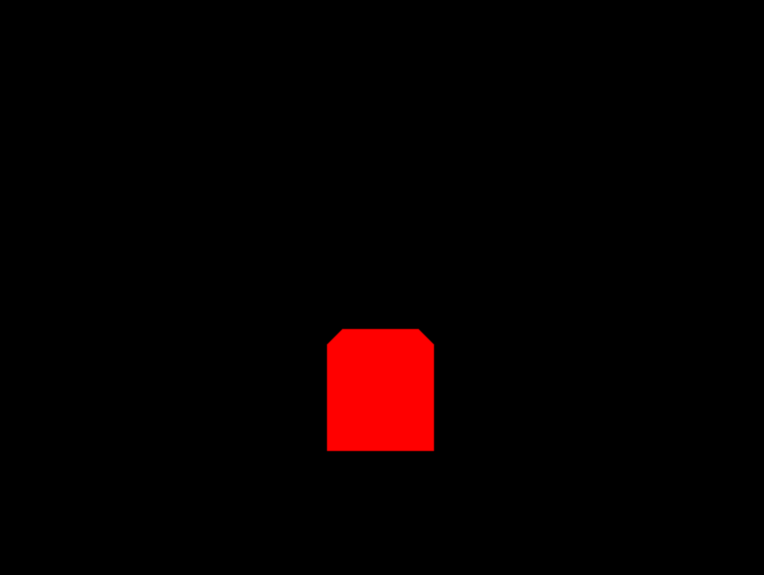
2.1.2. Create Your First 3D Scene
import static eu.svjatoslav.sixth.e3d.geometry.Point3D.point;
import eu.svjatoslav.sixth.e3d.gui.ViewFrame;
import eu.svjatoslav.sixth.e3d.math.Transform;
import eu.svjatoslav.sixth.e3d.renderer.raster.Color;
import eu.svjatoslav.sixth.e3d.renderer.raster.ShapeCollection;
import eu.svjatoslav.sixth.e3d.renderer.raster.shapes.composite.solid.SolidPolygonRectangularBox;

public class MyFirstScene {
    public static void main(String[] args) {
        // Create the application window
        ViewFrame viewFrame = new ViewFrame("My First Scene");

        // Get the collection where you add 3D shapes
        ShapeCollection shapes = viewFrame.getViewPanel().getRootShapeCollection();

        // Create a red box centered at origin
        final Transform boxTransform = new Transform();
        SolidPolygonRectangularBox box = new SolidPolygonRectangularBox(
                point(-50, -50, -50),
                point(50, 50, 50),
                Color.RED
        );
        box.setTransform(boxTransform);
        shapes.addShape(box);

        // Position your camera
        viewFrame.getViewPanel().getCamera().getTransform()
                .setTranslation(point(0, -100, -300));

        // Trigger initial render
        viewFrame.getViewPanel().repaintDuringNextViewUpdate();
    }
}
Compile and run MyFirstScene class. A new window should open that will display 3D scene with red box.
You should see this:
Navigating the scene:
| Input | Action |
|---|---|
| Arrow Up | Move forward |
| Arrow Down | Move backward |
| Arrow Left | Move left (strafe) |
| Arrow Right | Move right (strafe) |
| Mouse drag | Look around (rotate camera) |
| Mouse scroll wheel | Move up / down |
Movement uses physics-based acceleration for smooth, natural motion. The faster you're moving, the more acceleration builds up, creating an intuitive flying experience.
Press F12 in any demo to open the Developer Tools panel. This debugging interface provides real-time insight into the rendering pipeline with diagnostic toggles.
2.2. Coordinate system
eu.svjatoslav.sixth.e3d.examples.essentials.CoordinateSystemDemo
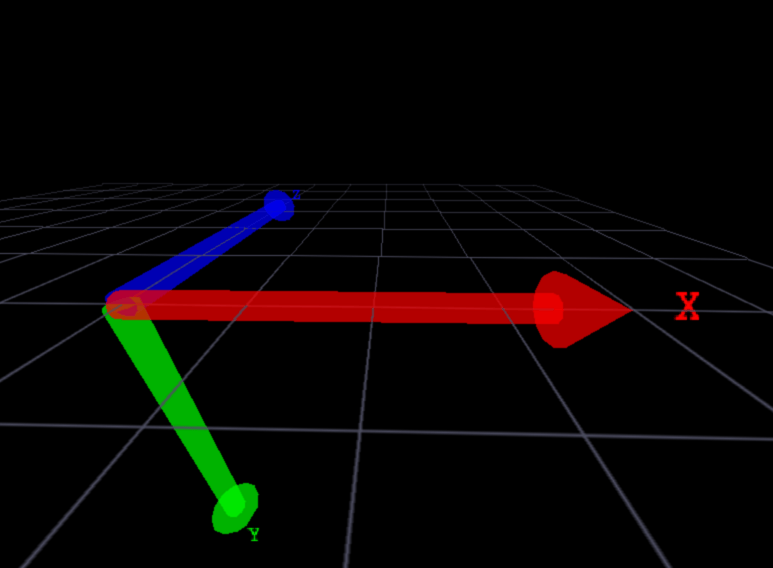
Visual reference for the Sixth 3D coordinate system using three colored arrows originating from (0,0,0):
| Axis | Color | Direction |
|---|---|---|
| X | Red | Points RIGHT (positive X) |
| Y | Green | Points DOWN (positive Y) |
| Z | Blue | Points AWAY from viewer (positive Z) |
A wireframe grid on the Y=0 plane provides spatial context and scale. Text labels (X, Y, Z) appear at each arrow tip.
This demo is essential for understanding Sixth 3D's coordinate system where:
- Positive Y goes down (screen coordinates convention)
- Positive Z goes into the screen (away from camera)
- Positive X goes to the right
See the Coordinate System section in the Sixth 3D documentation for a detailed explanation of the axis conventions and coordinate math.
2.3. Winding order
eu.svjatoslav.sixth.e3d.examples.essentials.WindingOrderDemo
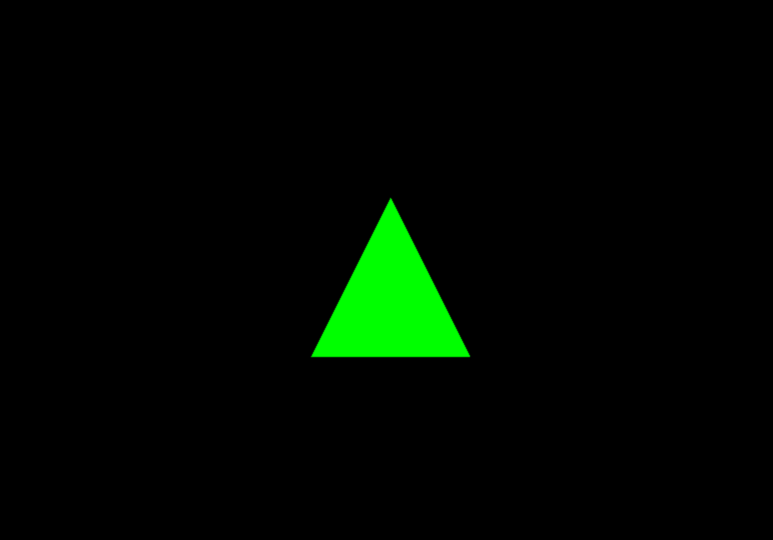
This demo demonstrates polygon winding order and backface culling - fundamental concepts for efficient 3D rendering.
The green triangle uses counter-clockwise (CCW) vertex ordering:
- Upper-center vertex
- Lower-left vertex
- Lower-right vertex
With backface culling enabled:
- CCW winding (negative signed area) = front-facing = visible
- CW winding (positive signed area) = back-facing = culled (not rendered)
This optimization prevents rendering polygons facing away from the camera, improving performance by roughly 50% for closed meshes. Navigate around the scene and observe that the triangle becomes invisible when viewed from behind, demonstrating the culling effect.
See the Winding Order & Backface Culling section in the Sixth 3D documentation for a detailed explanation with diagrams.
2.4. Shape gallery
eu.svjatoslav.sixth.e3d.examples.essentials.ShapeGalleryDemo
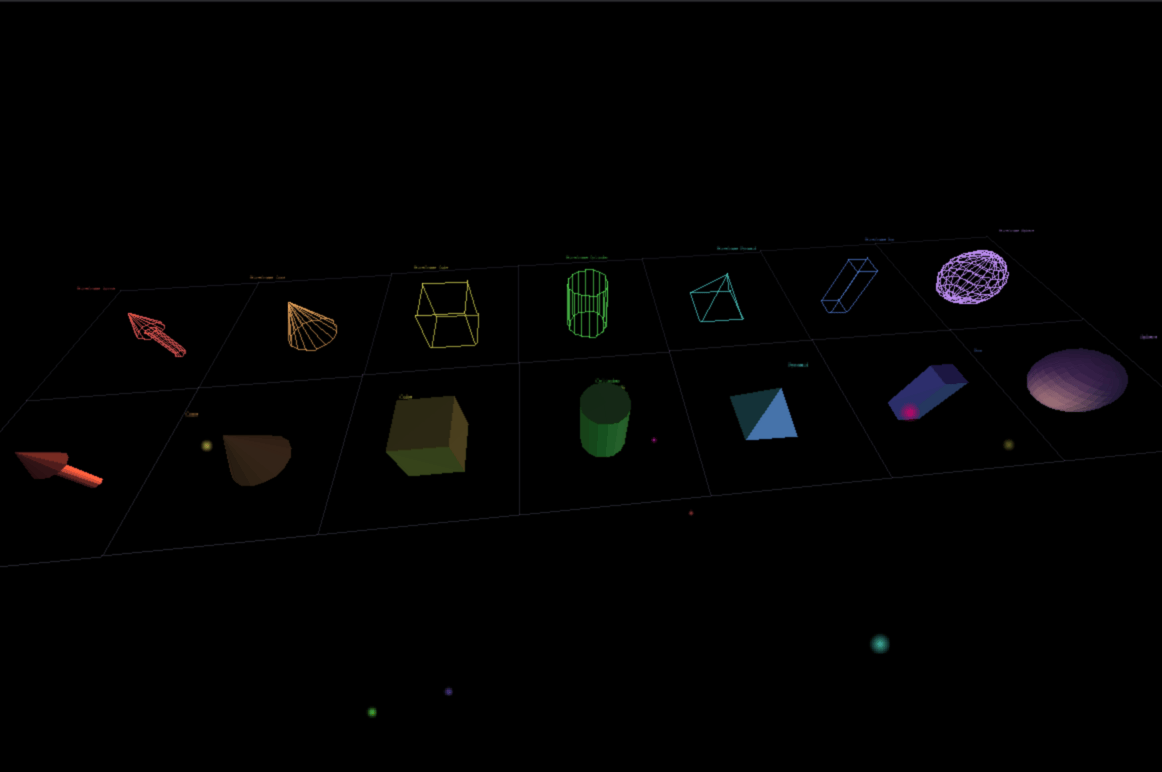
Comprehensive showcase of all primitive 3D shapes available in Sixth 3D, organized in a 7×2 grid:
| Column | Wireframe Shape | Solid Shape | Description |
|---|---|---|---|
| 1 | WireframeArrow | SolidPolygonArrow | 3D arrow with conical tip |
| 2 | WireframeCone | SolidPolygonCone | Circular base cone |
| 3 | WireframeCube | SolidPolygonCube | Regular hexahedron |
| 4 | WireframeCylinder | SolidPolygonCylinder | Tube with circular caps |
| 5 | WireframePyramid | SolidPolygonPyramid | Square base pyramid |
| 6 | WireframeBox | SolidPolygonRectangularBox | Rectangular parallelepiped |
| 7 | WireframeSphere | SolidPolygonSphere | Geodesic sphere approximation |
Top row: Wireframe versions - edges only, no surfaces Bottom row: Solid polygon versions - filled surfaces with lighting
Additional features demonstrated:
- Dynamic lighting from 10 orbiting colored light sources (visible as small glowing dots)
- Per-shape color assignment for visual distinction
- Grid floor showing spatial layout and alignment
- Text labels identifying each shape type
- Shading enabled on solid shapes to show lighting effects
See the Mesh section in the Sixth 3D documentation for an explanation of 3D mesh fundamentals and how shapes are constructed.
2.5. CSG demo
eu.svjatoslav.sixth.e3d.examples.essentials.CSGDemo
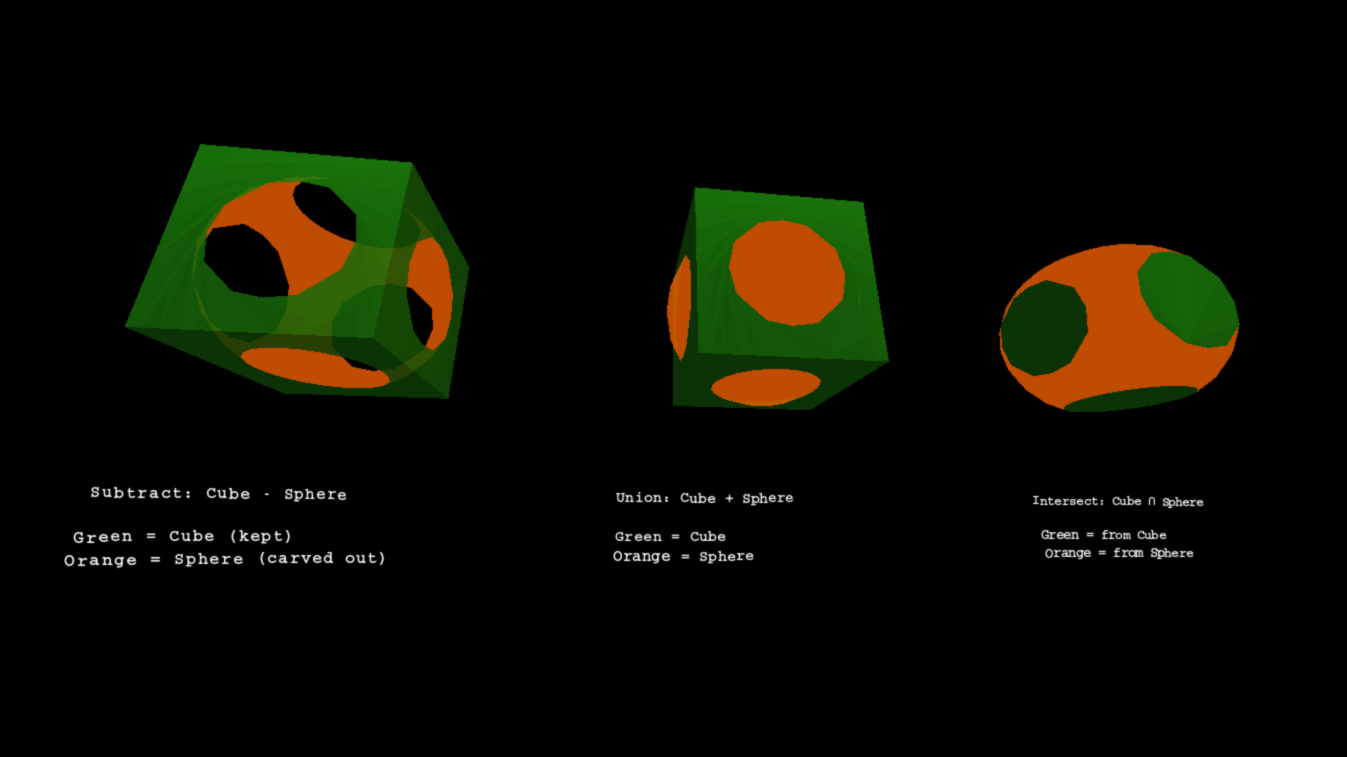
Constructive Solid Geometry (CSG) boolean operations on 3D meshes. Three operations displayed left to right:
- Subtract (Cube - Sphere) - A red cube with a spherical cavity carved out where a blue sphere intersects it. Shows the cube's interior surfaces.
- Union (Cube + Sphere) - A merged shape combining both volumes. Red surfaces from the cube, blue surfaces from the sphere, seamlessly joined.
- Intersect (Cube ∩ Sphere) - Only the volume shared by both shapes remains. Shows which parts of space were occupied by both the cube and sphere simultaneously.
Color scheme:
- Red = geometry from the first operand (cube)
- Blue = geometry from the second operand (sphere)
Each operation includes a text description panel below the shape. The demo uses:
- SolidPolygonCube (red)
- SolidPolygonSphere (blue)
- CSGSolid.subtract(), union(), intersect() methods
- toMesh() conversion for rendering
- Backface culling and shading enabled
CSG is powerful for procedural modeling, allowing complex shapes to be built from simple primitives through boolean combinations.
See the CSG documentation for a detailed explanation of the boolean operations.
2.6. Light sources
eu.svjatoslav.sixth.e3d.examples.essentials.LightSourceDemo
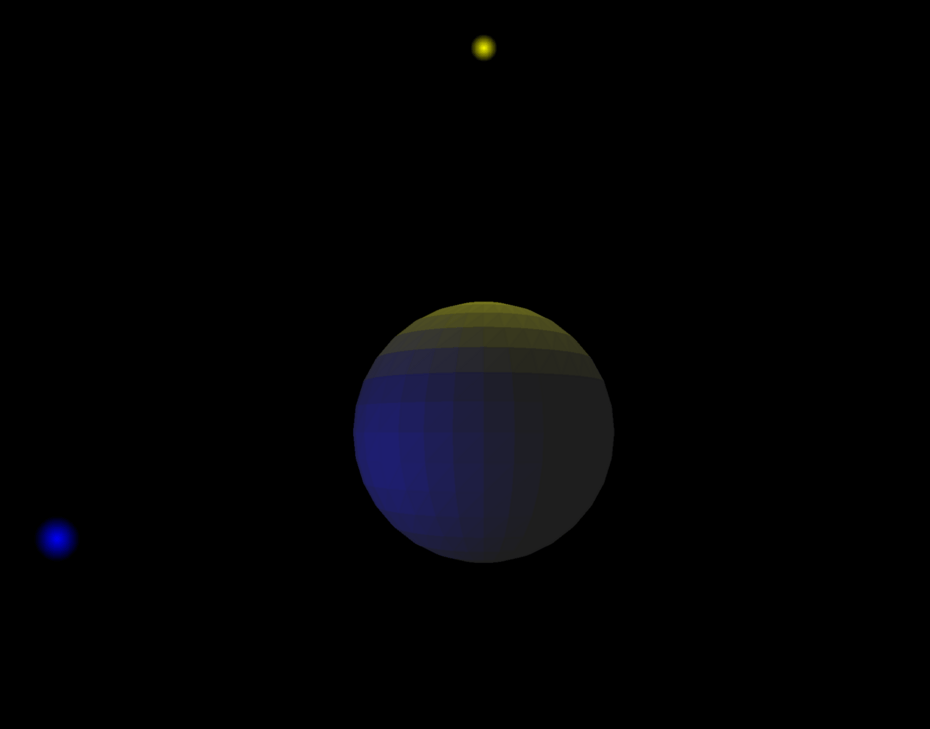
Demonstrates how multiple light sources illuminate a 3D surface and how their contributions combine to create complex lighting effects. A white sphere serves as the canvas, allowing light colors to mix visibly on its surface.
The white base color is crucial: colored lights tint the surface based on their own color. A yellow light creates warm yellow highlights, while a blue light adds cool blue tones. Where both lights influence the same surface area, their contributions add together, creating blended colors.
Light configuration:
| Light | Position | Color | Intensity | Description |
|---|---|---|---|---|
| Yellow | (0, -300, 0) | YELLOW | 2.0 | Directly above sphere (bright) |
| Blue | (-200, 50, -200) | BLUE | 0.5 | Left/below/close to camera (dim) |
The yellow light positioned directly above creates strong top-down illumination with high intensity (2.0). The blue light from the left-front side provides softer fill lighting at lower intensity (0.5). Low ambient light (30, 30, 30) ensures dramatic contrast between lit and shadowed areas.
Creating light sources:
import eu.svjatoslav.sixth.e3d.renderer.raster.lighting.LightSource;
import eu.svjatoslav.sixth.e3d.geometry.Point3D;
import eu.svjatoslav.sixth.e3d.renderer.raster.Color;

// Create a bright yellow light above the sphere
LightSource yellowLight = new LightSource(
    new Point3D(0, -300, 0),  // position: directly above
    Color.YELLOW,             // color
    2.0                       // intensity: extra bright
);

// Create a dim blue light from the left-front
LightSource blueLight = new LightSource(
    new Point3D(-200, 50, -200),
    Color.BLUE,
    0.5                       // intensity: dim
);
Each light source has three properties:
| Property | Description |
|---|---|
| Position | 3D world coordinates of the light |
| Color | RGB color of emitted light |
| Intensity | Brightness multiplier (1.0 = normal) |
Multiple light sources add their contributions together, allowing for complex lighting setups like the screenshot above showing a sphere lit by two lights.
Key concepts demonstrated:
- LightSource creation with position, color, and intensity
- LightSourceMarker for visualizing light positions in the scene
- setShadingEnabled(true) on shapes to enable lighting response
- Ambient light configuration for base illumination
- Multiple lights contributing to surface shading simultaneously
Small glowing dots mark each light source position, making it easy to understand where the illumination originates. These markers use the same color as their associated light source.
See the Shading & Lighting documentation for a detailed explanation of the Lambert cosine law, distance attenuation, and ambient light.
3. Advanced examples
3.1. Conway's Game of Life
eu.svjatoslav.sixth.e3d.examples.life_demo.Main
The Game of Life, also known simply as Life, is a cellular automaton devised by the British mathematician John Horton Conway in 1970.
- https://en.wikipedia.org/wiki/Conway%27s_Game_of_Life
- Game rules:
- 2 cell states: alive / dead
- Each cell sees 8 neighboring cells.
- If alive cell neighbors count is 2 or 3, then cell survives, otherwise it dies.
- Dead cell becomes alive if neighbors count is exactly 3.
- Game rules:

This demo projects the 2D game grid onto three-dimensional space. The extra dimension (height) visualizes history (previous iterations) using glowing dots suspended in space.
Usage:
| key | result |
|---|---|
| mouse click on the cell (cell) | toggles cell state |
| <space> | next iteration |
| ENTER | next iteration with the history |
| "c" | clear the matrix |
3.2. Text editors
eu.svjatoslav.sixth.e3d.examples.TextEditorDemo

Initial test for creating user interfaces in 3D, demonstrating:
- window focus handling
- picking objects using the mouse
- redirecting keyboard input to the focused window
Window focus acts like a stack.
When a window is clicked with the mouse, the previously focused window (if any) is pushed to the focus stack and the new window receives focus. A red frame appears around the window to indicate this.
When the ESC key is pressed, focus is returned to the previous window (if any).
When any window is focused, all keyboard input is redirected to that window, including cursor keys. To navigate around the world again, the window must be unfocused first by pressing the ESC key.
3.3. Text editors demo gallery
eu.svjatoslav.sixth.e3d.examples.TextEditorDemo2
Quite a lot of text editors can be rendered:

See also this similar-looking web-based demo!
3.4. Math graphs demo
eu.svjatoslav.sixth.e3d.examples.graph_demo.MathGraphsDemo

3.5. Sine heightmap and sphere
eu.svjatoslav.sixth.e3d.examples.SineHeightmap

Simple test scene. Easy to implement and looks nice.
3.6. Raytracing through voxels
eu.svjatoslav.sixth.e3d.examples.OctreeDemo

Test scene that is generated simultaneously using:
- conventional polygons
- for realtime navigation, and
- voxels
- for on-demand raytracing
Instead of storing voxels in a naive [X × Y × Z] array, a dynamically partitioned octree compresses the data. Press the "r" key anywhere in the scene to raytrace the current view through the compressed voxel data structure.
3.7. Point cloud galaxy
eu.svjatoslav.sixth.e3d.examples.galaxy_demo.PointCloudDemo
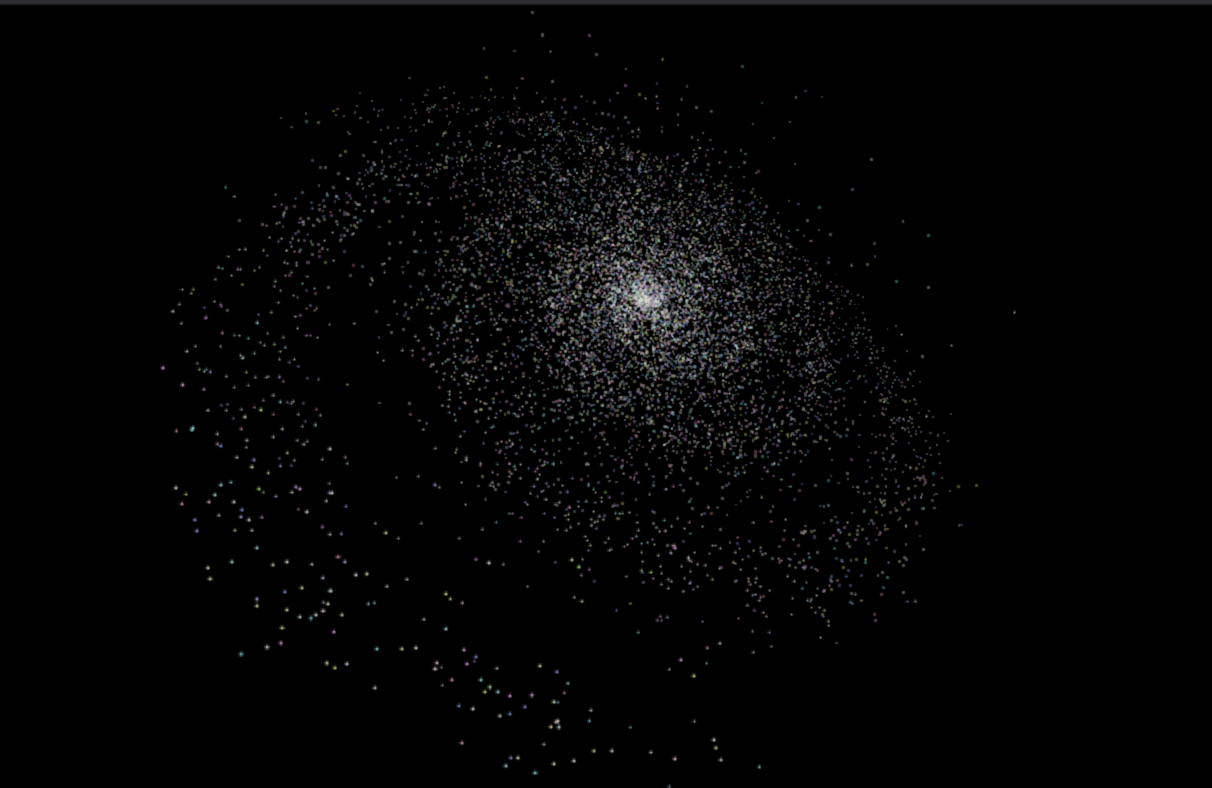
Spiral galaxy simulation composed of 10,000 glowing points rendered as GlowingPoint primitives. The galaxy features:
| Parameter | Value | Description |
|---|---|---|
| Stars | 10000 | Total number of glowing points |
| Spiral arms | 3 | Number of rotationally symmetric arms |
| Galaxy size | 500 | Scale factor determining radius |
| Unique colors | 30 | Palette size for texture reuse |
Optimization technique:
Colors are drawn from a pre-computed palette of 30 semi-bright colors (RGB values 0.5-1.5 with alpha 255). This enables texture caching - all stars of the same color share the same glow texture, reducing memory usage and improving rendering performance.
This demo showcases the engine's ability to efficiently render large numbers of billboard-style particles with per-point coloring.
3.8. Raining numbers
eu.svjatoslav.sixth.e3d.examples.RainingNumbersDemo

Animated "digital rain" effect. Creates 1000 randomly positioned TextCanvas objects displaying digits 0-9 that continuously fall through 3D space.
Animation mechanics:
The demo implements the FrameListener interface to update positions each frame:
- All text canvases translate downward by
millisecondsSinceLastFrame / 50units - Numbers falling below Y = +300 wrap around to Y = -300
- Creates an infinite, seamless animation loop
- Frame-rate independent movement via delta-time calculation
Visual characteristics:
Each digit is rendered with:
- Random position within a 600×600×600 cube
- Random RGBA color (fully opaque to semi-transparent)
- Random digit value (0-9)
This demo demonstrates:
- Real-time animation using frame listeners
- Efficient handling of many dynamic text objects
- World wrapping for infinite effects
- Per-instance color randomization
3.9. RGB cube
eu.svjatoslav.sixth.e3d.examples.RGBCubeDemo

Volumetric RGB color cube visualization composed of 10×10×10 square plates (1,000 total) arranged as flat XY planes along the Z axis. Each plate is built from two textured triangles using a solid-color texture with a black border.
Color mapping:
Each square's color is determined by its 3D grid position:
| Axis | Color channel | Range | Description |
|---|---|---|---|
| X | Red | 0–255 | Increases left to right |
| Y | Green | 0–255 | Increases top to bottom |
| Z | Blue | 0–255 | Increases front to back |
Visual characteristics:
- 10 parallel Z-layers, each containing a 10×10 grid of square plates
- Each plate: two textured triangles with a 32×32 pixel solid-color texture
- Black border (3 pixels) around each plate for visual separation
- Square size: 40×40 world units
- Cube extends ±200 units from origin in each axis
- Colors range from black (0,0,0) at one corner to white (255,255,255) at opposite corner
Usage:
Navigate around and through the cube to explore color relationships:
- Outer faces show primary/secondary color gradients
- Interior reveals color mixing in 3D space
- Fly through layers to see how blue component changes with depth
This demo demonstrates:
- Textured triangle rendering with per-cell color assignment
- 3D color space visualization
- Systematic grid-based geometry generation
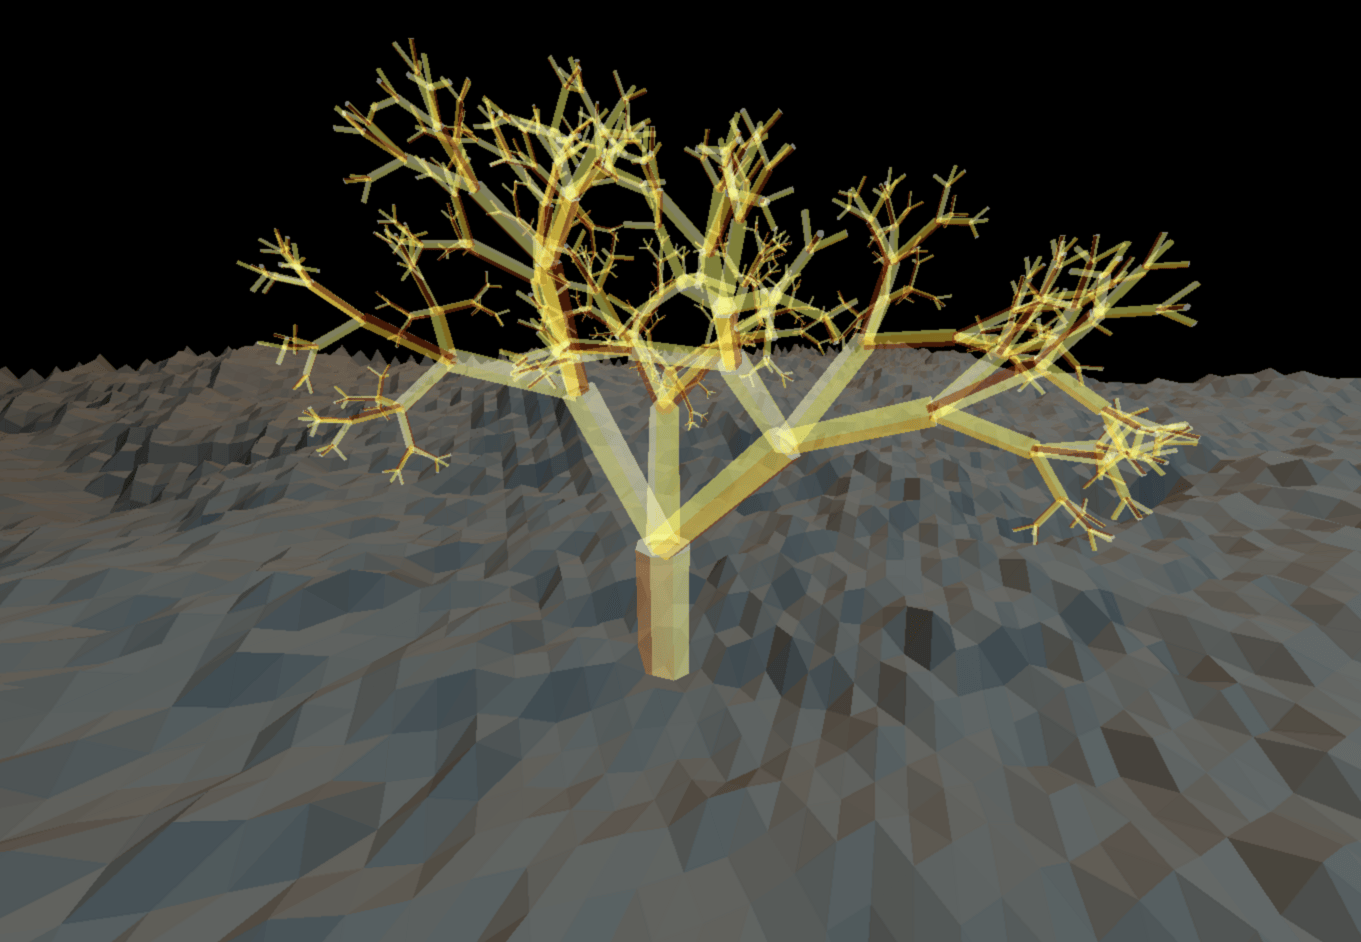
3.10. Procedural terrain
eu.svjatoslav.sixth.e3d.examples.terrain_demo.TerrainDemo
Demonstrates procedurally generated mountain terrain with an animated fractal tree. The scene features:
| Feature | Description |
|---|---|
| Terrain generation | Diamond-square algorithm with 129×129 heightmap |
| Height range | 0-100 units with natural mountain variation |
| Fractal tree | Recursive branching with cylinders |
| Dynamic lighting | Three colored light sources (warm, cool, neutral) |
| Real-time animation | Tree branches sway gently with cascading wobble motion |
Terrain generation:
The terrain uses the DiamondSquare algorithm to generate a heightmap with realistic mountain-like features.
Fractal tree:
The tree at the terrain center demonstrates hierarchical transforms in Sixth 3D:
- Trunk: Single vertical cylinder
- Level 0: 3 branches extending from trunk top (120° apart)
- Level 1: 9 sub-branches (3 per level-0 branch)
- Level 2: 27 fine branches (3 per level-1 branch)
- …
Each branch is an AbstractCompositeShape containing:
- SolidPolygonCylinder for the branch geometry
- Child branches positioned at the tip (recursive structure)
Animation system:
Branches sway using the FrameListener interface:
- Each branch has unique random phase offsets for X and Z axes
- Wobble calculated as: sin(frame × frequency + phase) × amplitude
- Parent rotation automatically propagates to children via TransformStack
- Creates cascading motion where sub-branches inherit parent wobble + add their own
Key classes:
- TerrainDemo - Main entry point and scene setup
- DiamondSquareTerrain - Procedural heightmap mesh generation
- FractalTree - Tree trunk with recursive branch hierarchy
- Branch - Individual branch with animation and child branches
Usage examples:
This demo showcases techniques useful for:
- Open world terrain generation
- Procedural vegetation (trees, plants)
- Hierarchical animation (character rigging, mechanical systems)
See also:
- Diamond-square algorithm on Wikipedia
4. Graphics Benchmark
eu.svjatoslav.sixth.e3d.examples.benchmark.GraphicsBenchmark

Automated graphics benchmark that measures the engine's rendering performance across five different rendering modes. Runs tests sequentially and outputs a detailed report with copy-to-clipboard functionality.
Benchmark configuration:
| Parameter | Value | Description |
|---|---|---|
| Resolution | 1920×1080 | Fixed window size |
| Grid size | 16×16×16 | Number of objects (4,096 total) |
| Test duration | 30 seconds | Per-test measurement time |
Benchmark tests:
| # | Test | What it measures |
|---|---|---|
| 1 | Solid Cubes | Semi-transparent solid polygon rasterization (alpha = 40) |
| 2 | Lit Solid Cubes | Opaque polygons with dynamic lighting and per-pixel shading |
| 3 | Textured Cubes | Texture mapping and sampling with 20 unique glow textures |
| 4 | Wireframe Cubes | Line rendering with 5.5 unit stroke width |
| 5 | Star Grid | Billboard (GlowingPoint) rendering with texture blending |
Test details:
- Solid Cubes (SolidCubesTest)
- Uses SolidPolygonCube with random semi-transparent colors
- Alpha channel set to 40 for blending overhead measurement
- Lit Solid Cubes (LitSolidCubesTest)
- Fully opaque cubes with shading enabled
- Three orbiting light sources (red, green, blue)
- Ambient light: Color(15, 15, 20)
- Lights follow elliptical paths at 600 unit radius
- Tests dynamic lighting calculations and shadow computation
- Textured Cubes (TexturedCubesTest)
- Uses custom TexturedCube class
- 20 procedurally generated glow textures (64×64 pixels)
- Tests texture memory usage and sampling performance
- Each cube assigned random texture from pool
- Wireframe Cubes (WireframeCubesTest)
- Uses WireframeBox with custom LineAppearance
- Line width: 5.5 units
- Semi-transparent colors (alpha = 50)
- Tests line rasterization and anti-aliasing
- Star Grid (StarGridTest)
- Uses GlowingPoint billboards
- Star size: 20 units
- 30 unique colors in shared palette (texture reuse optimization)
- Tests billboard rendering and texture blending efficiency
Usage:
- Launch from demo launcher or run main class directly
- Intro dialog appears with three options:
- Short Test — runs all tests once with current thread count (30 seconds per test)
- Extended Test — runs all tests multiple times with increasing thread counts (5 seconds per test) to measure threading scaling
- Cancel — abort without running
- Press Space to skip current test (reduces measurement precision)
- Results dialog appears after all tests complete
- Click "Copy to Clipboard" to save results for comparison
Short test example:
================================================================================
                         GRAPHICS BENCHMARK RESULTS
================================================================================
Date:        2026-03-16 19:17:51
Resolution:  1920x1080
Cubes:       4096 (16x16x16 grid)
Duration:    30 seconds per test
Mode:        Short

--------------------------------------------------------------------------------
SYSTEM INFORMATION
--------------------------------------------------------------------------------
CPU Name:    AMD Ryzen AI 9 HX 370 w/ Radeon 890M
Arch:        amd64
CPU cores:   24

--------------------------------------------------------------------------------
Test                         Avg FPS
--------------------------------------------------------------------------------
Solid Cubes                  49.65
Lit Solid Cubes              41.40
Textured Cubes               32.80
Wireframe Cubes              42.84
Star Grid                    318.97
================================================================================
Extended test:
The extended test measures how rendering performance scales with thread count. It starts with 1 thread, then increases by 1.5× (rounded, minimum +1) until reaching the CPU core count. Each test scene runs for 5 seconds per thread count step. The result is a matrix showing average FPS for each scene × thread count combination.
Extended test example:
================================================================================
                         GRAPHICS BENCHMARK RESULTS
================================================================================
Date:        2026-05-12 01:13:41
Resolution:  1920x1080
Cubes:       4096 (16x16x16 grid)
Duration:    5 seconds per test
Mode:        Extended (multi-thread)

--------------------------------------------------------------------------------
SYSTEM INFORMATION
--------------------------------------------------------------------------------
CPU Name:    AMD Ryzen AI 9 HX 370 w/ Radeon 890M
Arch:        amd64
CPU cores:   24

--------------------------------------------------------------------------------
THREAD SCALING RESULTS (Avg FPS)
--------------------------------------------------------------------------------
Test \ Threads                       1         2         3         5         8        12        18        24
--------------------------------------------------------------------------------
Solid Cubes                      21.03     26.52     29.29     31.13     30.93     26.34     29.10     25.49
Lit Solid Cubes                  28.21     34.07     36.08     26.46     25.49     31.42     25.17     25.33
Textured Cubes                   17.08     25.52     25.51     25.98     25.24     24.61     19.51     26.37
Wireframe Cubes                  18.80     29.55     32.02     27.89     26.42     31.89     30.71     31.64
Star Grid                       185.09    255.10    266.75    267.00    281.60    297.08    291.88    310.74
================================================================================
The benchmark captures CPU name, architecture, and core count for cross-system comparisons. The thread scaling matrix makes it easy to identify the optimal thread count for each rendering workload.
5. Source code
This program is free software, released under the Creative Commons Zero (CC0) license.
Program author:
- Svjatoslav Agejenko
- Homepage: https://svjatoslav.eu
- Email: mailto://svjatoslav@svjatoslav.eu
- See also: Other software projects hosted at svjatoslav.eu
Getting the source code:
- Download latest snapshot in TAR GZ format
- Browse Git repository online
Clone Git repository using command:
git clone https://www2.svjatoslav.eu/git/sixth-3d-demos.git
Understanding the Sixth 3D demos source code: